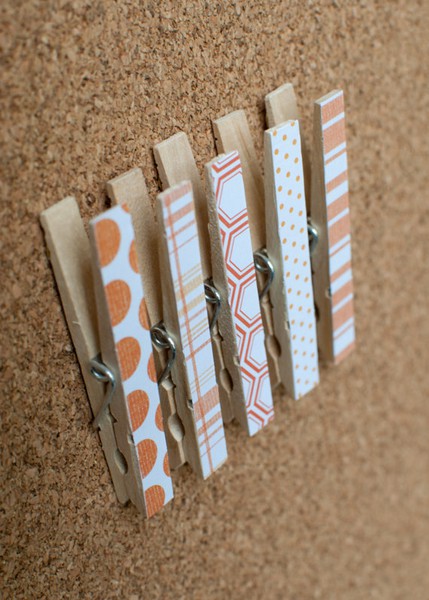
Pinspiration Monday: DIY Clothespin Pushpins

I’ve said it before, but I’ll say it again – I love when people come up with creative ways to turn utilitarian items into something adorable. Take these clothespins for example – One crafty lady decided to transform these inexpensive little wooden clips into something both pretty and functional, simply by adding decorative craft paper and thumb tacks. Awesome. And by turning them into pushpins for your bulletin board, they can be admired each and every day.

Source: Krafty Design

Is it sad that this excites me so much? I KNOW that I can’t be the only one…

Well, they excited me so much that I decided to make my own set. First things first, the clothespins – John sweetly picked up this cheap pack of 50 for me while at the grocery store, but you can find them at pretty much any home improvement or craft store.

As for the paper, I am still working my way through a giant book of scrapbooking paper that I have used for countless projects (such as this one and this one). I began with the pretty blue and white pattern below – A tight repetitive design is best since the surface area of a clothespin is rather small, and you don’t want the detail of a large blown-out pattern to get lost.

I flipped the paper over and laid my clothespin on top, then proceeded to trace around the edge with a pen.

After cutting the shape out, I took some generic craft glue and squeezed a few lines across the top of the pin. I gently laid the cut out on top of the glue, jimmied it around until it matched up with the edge and then let it dry for about ten minutes.

In the meantime, I went ahead with the other three pins in my set of four. Again, I kept my eye out for small patterns in my book of paper and ended up with a cheerfully colorful collection.

Time for the push pins…I used four flat head thumb tacks that I had on hand. Unlike the more standard push pins which have slightly domed heads, these pins are perfectly straight across – Great for adhering flush to the undersides of my clothespin clips.

To attach them, I used wood glue thinking that they would stick best to my, well…WOODEN clothespins (as seen in the below photos). However, in the interest of full disclosure, the wood glue stuck well to the clothespins but not well at all to the plastic/metal push pins. I ended up redoing the adhesion process with super glue, which seems to have done the trick. When in doubt, use super glue!

Here’s my collection of decorative clothespin push pins adding a little interest to my inspiration board. I love the pop of pattern and color and think they are a huge upgrade over plain push pins or thumb tacks.

P.S. This project also was featured as a guest post for Breathe Magazine. Feel free to click over and take a look – Enjoy!

All in the details…

I can tell you right now, with absolutely no hesitation, that this is my favorite room. Of. All. Time. Styled by Emily Henderson for the lovely and creative Joy (of Oh Joy!), it’s just the epitome of perfection. You can read up on the process (including tons of source i.d.’s) here and here on Emily’s blog, but today, I’m going to get into the details of why I think this room works so well. P.S. Sorry that I’m not sorry for this post eventually turning into a slightly uncomfortable love letter to Ms. Henderson…

FURNITURE

Emily always knocks it out of the park when it comes to furniture. Most of the pieces she uses are vintage, either cleaned up and left in their original materials, or re-purposed, recovered and given a whole new life. Oh, what I would do to have the chance to shop where she does…The mid-century vibes here are given a little glam with chrome details, but the wood touches in the side table and coffee table balance it out so that it’s not so WOA in-your-face metallic.

COUCH

What can I say about the couch, other than it’s G-O-R-G-E-O-U-S? Again, it’s that period-specific mid-century style (although actually a Big Box Store purchase from Room & Board) with a hint of something unusual in the slight slant to the arm. Love the clean lines, love the color, love the simple touch of pattern in the accent pillows. I’m glad that the legs are simple too – It’s all in that careful balance again. This room could so easily shift into “too much,” but the colors/pattern/texture are styled juuuuusssssssttttttt right to remain calm and collected.

WALLPAPER

This wallpaper, a design actually by the homeowner herself, has this fabulous metallic sheen. You can get a slight sense of it in the first photo in this post, right over the couch – See where you can hardly even see it anymore from the light shining on it? I think that’s what makes it so easy on the eyes despite the wild pattern. Sometimes you see it, sometimes you don’t. It also comes in a silvery blue color, which would be even more of a visual play. I love it. I can’t afford enough to cover even one wall in our home, but I bought a swatch and framed it just to have a little piece of this room in our house (as seen in this photo).

TEXTURE

We’ve got pretty much every type of texture there is in this room – Metallics (trunk), fluffy (accent pillow), wood (coffee table), polyester/cotton blend (sofa) and wool/cotton blends (rug and carpet). In my opinion, the more the merrier when it comes to texture. It’s a subtle way to give a room interest without having to resort to a crazy color pallet.

ART

I’ve already gone ahead and pinned my favorite pieces for future purposes…Which means that much of the art in this room is attainable for “normal” people like me! That lemon print at the top is under $30 – Awesome. But if you wanted to get the same eclectic look for even less than that, just hop over to your nearest thrift shop and start digging. Don’t get bogged down with finding pieces that have to be so special that they can hold their own – This type of multi-piece gallery wall is meant to make ho-hum pieces look amazing as a collection. One of my favorite ways to hang art…

STYLING

Emily always manages to group objects with what seems like no effort at all – as though they’ve been that way forever. Fundamentals behind her groupings: unlike heights, unlike colors, unlike textures. Asymmetry seems to be the secret to styling success, and I’m more than happy to follow suit. You can too!

So what are your favorite details?

For all of my top inspirational spaces, click here, and for the whole slew of “All in the details…” features, click here.

getsocial
have yousubscribed?
Everybody's doin' it.