

I’ve had this painted nesting dolls project on my mind ever since last year, but have been stuck on just how to actually execute the craft. Should I follow the classic art of Matroschka doll designs, with lots of earthy colors and detailed patterns? Or maybe I could do something a little simpler and more modern, like these designs?
After months of brainstorming and even getting John to weigh in with his own ideas, it hit me that I didn’t need to overthink the design or even try to copy what had already classically been done. Instead, I went with a design that couldn’t be simpler and that we all truly could do on our own. Read on for the details (and free printable!) behind my DIY Decorative Painted Heart Faced Nesting Dolls.


- Plain wooden nesting dolls
- Plastic paint tray
- Acrylic paint
- Paint brushes
- Printable heart template
- Cardstock
- Scissors
- Pencil
- Cup of water (optional)
- Paper towel (optional)
Start by un-nesting your wooden dolls, and then paint the outside surface a bright white using chalk or acrylic paint. Note that it may take several coats of paint to completely cover the wooden finish underneath. Allow 30 minutes between each coat to let the paint dry, and then give the painted dolls several hours to fully cure after the final coat.

Next, download and print my DIY Heart Faced Nesting Doll Template onto cardstock. Granted, the heart images are a touch grainy since I used a free heart clipart shape, but they get the job done! After printing, use scissors to cut out each of the five hearts and set aside. Discard or recycle the scrap paper.
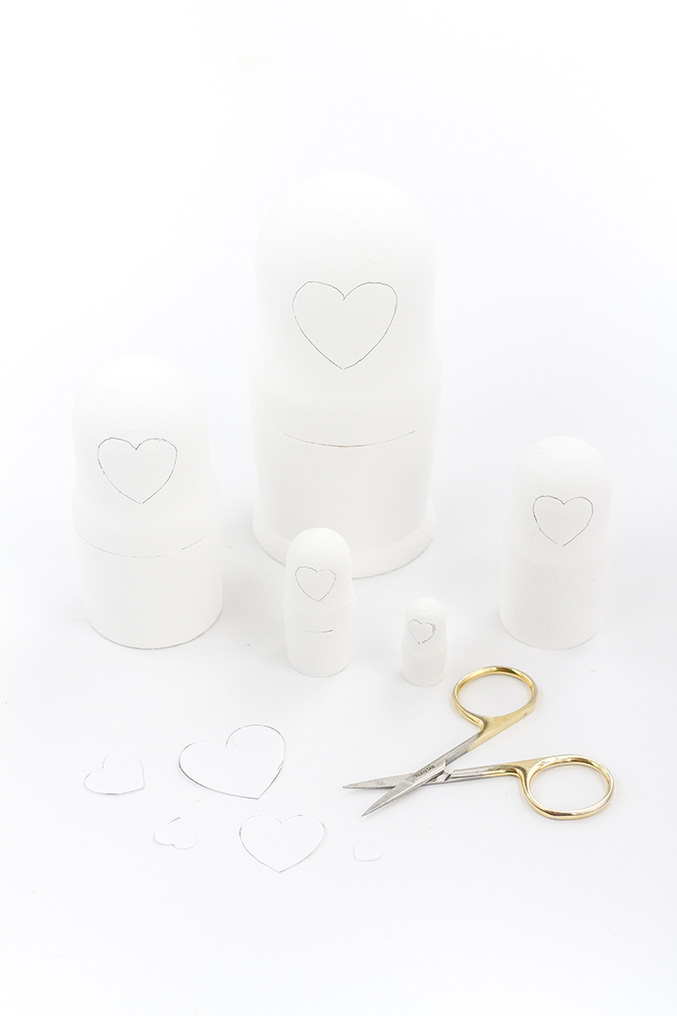
Lay each of the hearts one by one on the “face” of your painted nesting dolls with your finger tip, and trace the shape lightly onto the doll with a pencil. The largest heart will go on the largest nesting doll, and the next largest heart will go on the next largest doll. Repeat this step so on and so forth with the consecutively smaller heart templates and dolls until each has a traced face.
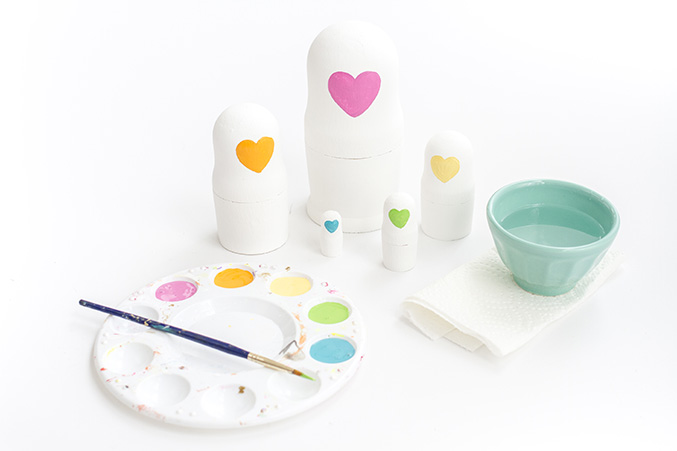
Finish by painting inside the lines of each of the heart-shaped faces using different colors of acrylic paint each time. You may want to keep a cup of clean tap water and a paper towel on hand to quickly clean your paint brush between coats.
Paint as many coats of paint as you need to so that you can no longer see the pencil lines or white finish beneath the color. Allow the paint to dry for 30 minutes between each of the coats, and give the final coats of paint several hours to fully cure before handling.

What do you think? Couldn’t be simpler right? But now I want to know: would you have gone the extra mile and painted something meticulous and detailed to match the classic art of Matroschka doll designs? I’m all ears!
P.S. In case you haven’t entered, there’s still time to put your name up to win a copy of The Ultimate Photography Book For Bloggers! Click through to Instagram here (or to this post if you don’t have IG) to enter.


Haha Carrie, love the “outside of the box” thinking! Although, when this picture came up on my feed–I froze. I hate to say it but these look like a grouping of different sized vibrators!!
Well, darn! That’s not good!! Thanks for the heads up, haha!
These are wicked cute!!! Love love love the heart design – simpler is better! And you are too kind to provide us with a printable for tracing to make it even easier. Also that first picture is my favorite, so gorgeous! <3 <3 <3
Thank you, Marlene!! SO glad you like how they turned out! 🙂
Love the cheerful colors!
Thank you so much!! 🙂
I remember as a kid I used to play with red decorated matryoschka dolls, they were fascinating. I love how you have painted them, they make great piece of art that one can adorn their shelf with.
I’m so glad you like how my dolls came out, and that you have fond memories of matryoshka dolls, too!!
So minimal and cute! definitely adding this to my crafting give-it-a-go list 🙂
Thanks! Let me know if you try it out. Would love to see pictures!!